Chicken Noodle Soup – A Cure for Cold Season

When the long Minnesota winter is starting to wear on us, there are certain classic recipes that we revisit every year.  A bowl of homemade soup provides a fortifying boost of energy and straightforward, clean flavors that help a body endure the waning months of cold and darkness.Chicken-less Chicken Noodle Soup on ourwaytoeat.com

A steaming bowl of chicken or chicken-less noodle soup is a warming cure for winter blahs if I know one.  It is so comforting if you have a cold.  I don’t follow an exact recipe to make Chicken and Chicken-less Noodle soup.  I chop a few peeled carrots, a few ribs of celery and onion, and saute them in a little oil until fragrant, but still crisp.  Then, I add about 5 cups of broth, (homemade when I have it).  I bring the soup to a point beyond a simmer and add two handfuls of frozen peas.  When the soup returns to almost-boiling I add a few handfuls of egg noodles, and about a quarter cup of chopped fresh parsley.  I like to use ample, wavy, dumpling egg noodles.  They need 6-10 minutes of cooking time to cook to tender, but not soggy.  Bowl of Chicken-less Noodle Soup
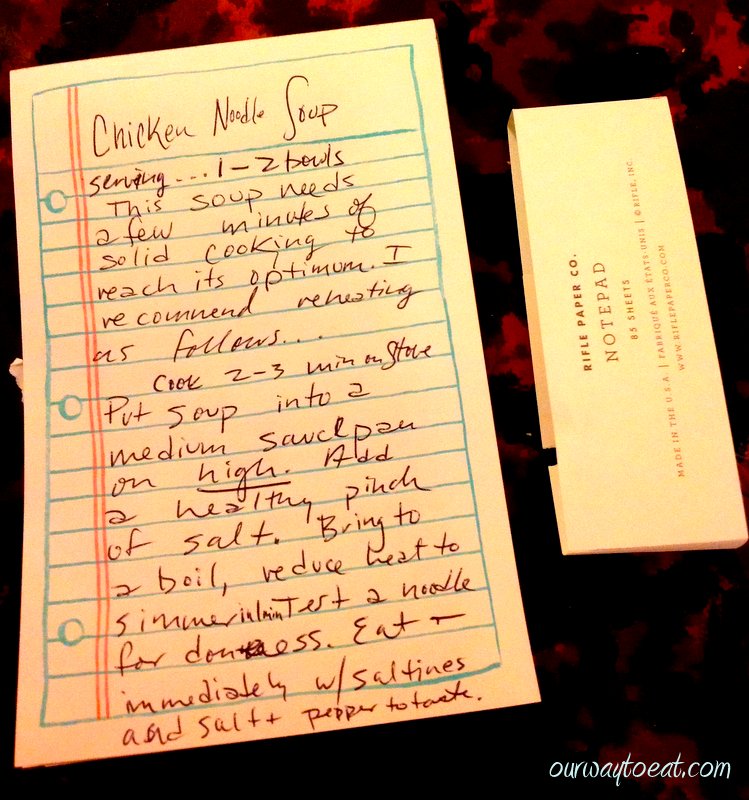
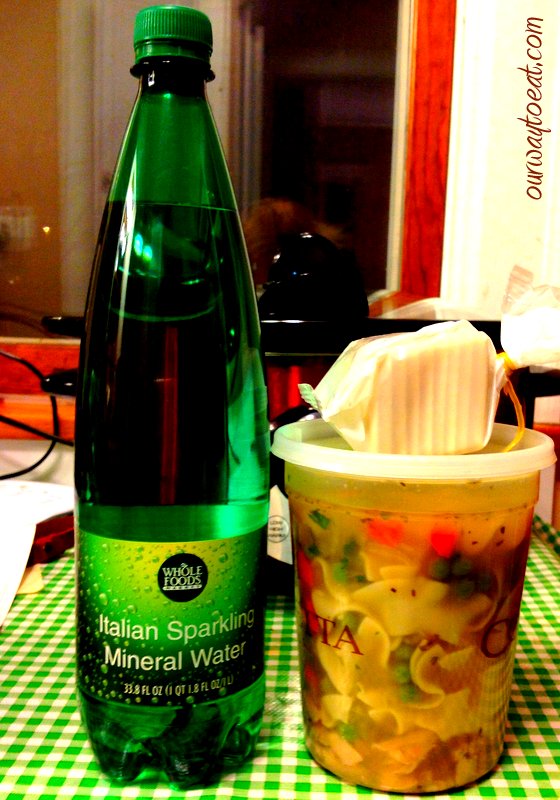
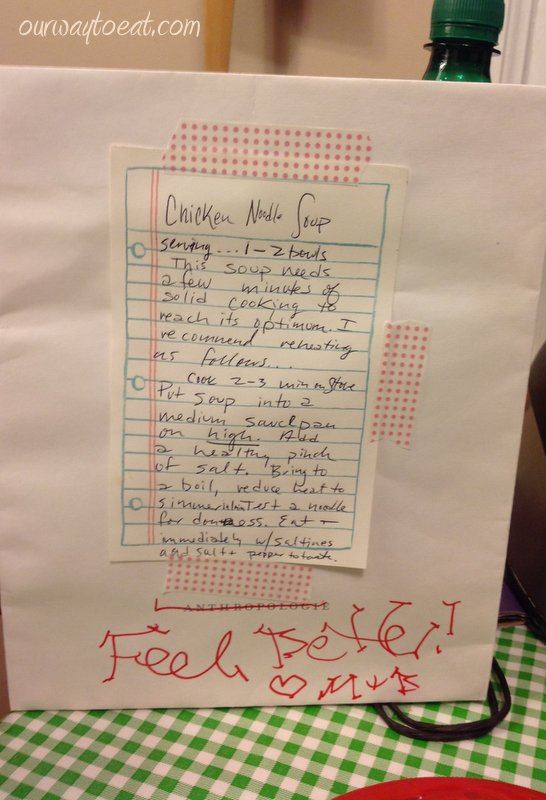
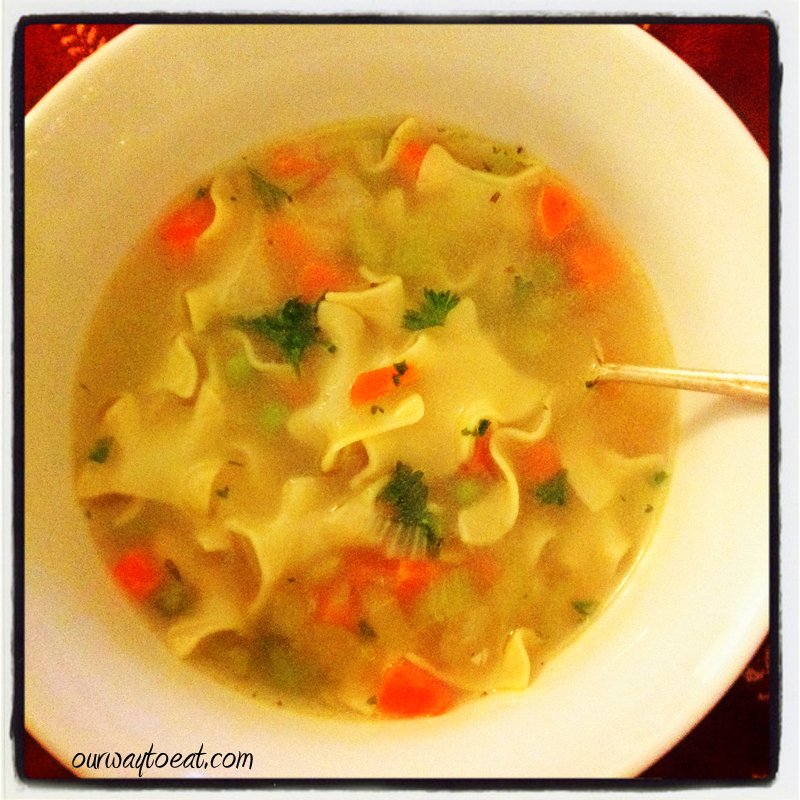
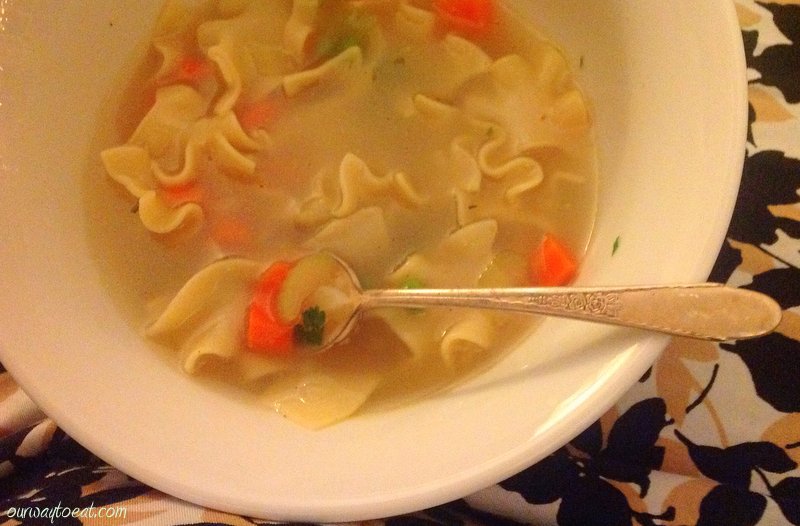
In order to make chicken-less soup for myself, and classic chicken noodle soup for Bjorn, I saute chicken breasts or thighs separately.  When the chicken is cooked through, I chop it and add a hearty serving of chopped chicken to his bowl.  You can make a whole pot of chicken-less soup if everyone prefers, or you can saute the chicken along with the veggies if everyone at your house eats chicken.  Before serving, I adjust the flavour with salt and pepper.  If you are a stickler for following a recipe, Martha Stewart’s Chicken Noodle Soup is similar to my general guidelines, except that she doesn’t add peas; she opts for dill instead of parsley and she uses quick-cooking vermicelli noodles instead of wide egg noodles.  This soup is flexible.  You could add other veggies.  For me, I like to stick to the classic Chicken Noodle soup ingredients, except that I leave out the meat.

Chicken Noodle Soup Heating Instructions

A little while ago, Bjorn’s brother was under the weather, so we decided to bring him a serving of our soup. I removed a portion of the soup and put it in a disposable container before the noodles were fully cooked so that he could bring the soup up to temp without the noodles getting soggy.Cold Season Care Package

To round out our care package, we added a bottle of fizzy mineral water for some electrolytes and a quarter-sleeve of saltines to go along with the soup.

Get Well Soon Care Package

I taped my handwritten instructions to a small bag with washi tape and we dropped the package off at Brett’s house, hoping to bring a little warmth and cheer to a dreary sick day.  Homemade soup tastes wonderful and fills the house with a comforting aroma.  This soup is made entirely of staples that are usually on hand in the pantry and freezer.  Chicken Noodle soup cooks quickly and provides comfort, flavor and textures you just can’t get from a can.  When you’ve had it with winter, remember to make this soup!

Chicken Noodle Soup

A Lesson in Lefse for Bjorn from Grandma Eldrice

Gallery

This gallery contains 20 photos.

My father is Norwegian by birth, and so some Norwegian characteristics have come to me naturally.  Having hearty tolerance of long winters and cold temperatures has been truly helpful throughout my life.  Even so, I have wished on more than … Continue reading

Thanksgiving Preview

Thanksgiving is only a few days away.  I am looking forward to it!  It will be our third year hosting my parents, in-laws and brother-in-law at our house.  Thanksgiving traditions have varied and evolved throughout my life from being celebrated in October (in Canada) to having a large gathering at my parents house or Bjorn’s Aunt and Uncle’s to a smaller gathering at our house.  This has become one of my favorite long weekends of the year being with both of our families, eating well, relaxing and having lots of laughs.  Here is a peek at last year’s Thanksgiving preparation and the resulting meal.  It is also a reliable preview of this year’s anticipated event.  There will some tweaks to the menu to keep things interesting, but we’ll serve our most-loved standbys to make sure everyone get their favorite traditional Turkey Day dish.

Meal Preparation:

1.  Our home from the front, framed by a gorgeous golden-leafed maple tree.  This year all of our leaves have fallen and have been raked and hauled away.  We’ve become much more zen about raking and hauling leaves this year.  It is a huge job, but we’re used to it, and we enjoy being outside in the fresh air and we love these gorgeous maples so much.  It sure is nice to have a cleaned up yard before snowfall this year.

2.  City Bread, drying out for stuffing.  City Bread is my favorite rye bread from Winnipeg which made the bulk of our stuffing last year.  We’re due to visit the ‘Peg, our freezer is empty!

3.  Last year I brined the Turkey using this recipe from Macheesmo.  Everyone reported the bird to be juicy and flavorful and despite concerns, I was pleased that I could still make a tasty gravy using the drippings.  This year I am not brining the bird.  Bjorn is brining a bone-in turkey breast that he will smoke, so I’m skipping that step since my roast turkey will play second fiddle.  I wouldn’t roast a turkey, but we simply must so that we can make gravy!

4.  Our little house from the back, again the maple leaves last year were gorgeous.  This year, with the leaves down the focal point of this view of our house is the new roof, which is cottage red.  I love it, but I’m waiting for some finishing work to be done in front before I post pictures.

5.  Toasting sage from the garden for my Mosaic Stuffing.  I call my dressing Mosaic Stuffing because I clean out my freezer and use up the random loaves, rolls and bread ends that I’ve been hoarding in the freezer for the last few months.  I love using a variety of bread with different flavors and textures as a basis for my dressing. I follow my Mom’s dressing recipe which comes together on the spot with her coaching.  It is a simple recipe with bread, butter, sautéed onions, celery, salt, pepper, sage, broth and milk, similar to the recipe from the 1967 edition of the Betty Crocker cookbook but with some extra love and instinct as to seasonings, amount of milk and cooking time.  We like it crispy on top and moist in the middle.

6.  Sauteing celery and onions in butter for the stuffing.

7.  Two pans of stuffing, one for today, and the next for the equally important Leftovers Meal, eaten tomorrow.

8.  We round out our plates with a variety of roasted root vegetables:  carrots, parsnip, and beets, coated lightly in olive oil and tossed with a generous handful of chopped fresh herbs.

9.  Last year I grew one square foot of turnips which we saved for Thanksgiving.

10.  Bjorn made the turnips into a Turnip Puff.  It was a tasty vegetarian side dish, though it isn’t on the menu this year since we didn’t grow turnips!

11.  Scalloped Corn is another Thanksgiving standby which will be repeated this year, except this year I am going to add more whole corn kernels as well as creamed corn and bake it in a cast-iron skillet.

12.  We make a huge pot of creamy, buttery mashed potatoes because everyone loves them.  I was very disappointed by the potato selection last year at Lunds– by the time I got there to shop, so many of the potatoes were green.  This year I bought a bushel basket of Yukon golds from the Saint Paul Farmer’s Market.  There isn’t exactly a crowd shopping at the market this late in the season, so I had my pick of potatoes and the friendly seller assured me they had just been dug and wouldn’t be green by Thursday.  Shrinking the carbon footprint of our meal where I can, and having my selection of freshly dug potatoes is win-win in my book.

13.  It is an all-hands-on-deck meal situation at our house.  I haul out the roaster, use the crock pot and have every precious square inch of kitchen counter and table space in use to prepare this meal.

14.  In contrast to the last two years, I bought a turkey from Lunds instead of from the Farmer’s Market this year.  I haven’t had a lot of success buying a local turkey.  I stood in line for two hours in 2010 to pick up a monstrous golden turkey, and could hardly thaw myself or get the bird cooked in time to eat the next day.  Last year, our pre-ordered “fresh” local turkey was frozen and missing a wing.  I’m willing to pay for quality locally grown meat, but when I’m paying a premium, I need to be assured that quality will be delivered.  This year, I wanted a smaller bird and so I went the easy route.  Yes, I do feel a bit guilty for not buying totally local when I can, but I decided to give myself a break.  I am much happier with a completely fresh, free range bird which weighs about 12 pounds.  I will be stuffing the bird with herbs and fruit, and covering it with butter and bacon, which is a family tradition, passed down from my Grammie.

Grammie roasting a huge turkey topped with bacon.  Look at that Golden Bird!  

15.  Even though I used an electric roaster and crock pot, the oven was packed.  I’m planning fewer dishes this year so we should have oven space to spare.

16.  We will set the table using our Mikasa Cameo Platinum wedding china.  It is simple and clean-looking, and I love it.  This year, we have the full set including gravy boat!  I am going to warm up the table decor a little bit this year, more candles, more colour, though the plated food will remain the focal point.

The Thanksgiving Meal:

1.  Get a load of that plate of food!  You will note that we enjoy both traditional cranberry sauce made by my mother-in-law, and jellied from a can.  We also are so very fortunate that my mother-in-law and Bjorn’s Grandma make lefse together.  My Dad and Grandfather were born in Norway, but they moved to Canada without packing their traditional Norwegian recipes, so I am pretty pleased to have married into a family in which the lefse-making tradition is going strong.  I have had a lesson from Bjorn’s Grandma, and I will share that some time.

2.  Mashed potatoes topped with chopped chives.  I dried tons of herbs from our garden which I will use in Thanksgiving dishes and throughout the winter.  This is a meal where I splurge on fresh herbs, though hopefully never again after this year, since I’m planning to plant a little indoor herb garden soon.  They make everything look great and they add wonderful flavor and color that I love to see on our Thanksgiving table.

3.  “Don’t drown your food” was a catchphrase from educational children’s public television.  That message sunk deep into my brain.  This is the one time of year I ignore it.  To me, pumpkin pie is only to be served with a mighty dollop of sweetened, freshly whipped cream.

4.  What is my key to a stress-free Thanksgiving?  Say “yes” when people offer to bring things, especially things you aren’t good at making.  I have never in all my born days baked a pie.  If we’re lucky, maybe I never will.  Thanks Mom!

5.  The table looks festive once it is covered in an array of platters topped with appealing, sumptuous Thanksgiving standards.  We’re ready to dig in!

6.  Another impressive plate of food, this one topped with the brined, roasted turkey.  You can see the lovely roasted golden beets on the right of the plate.  They will be making an appearance again at our Thanksgiving table this year.

7.  My immediate family, from left to right, my Mom, mother-in-law; brother-in-law, Dad, father-in-law and my darling Bjorn.

8.  Another view of the table, close enough to see the roast turkey, carved and arranged by Bjorn, and a gorgeous platter of carrots and parsnip covered in herbs.

9.  We have a buffet in our dining room which holds the dinner-table overflow.  Here, wine bottles are ready to top-up our glasses, dressing stays warm in the crock, and scalloped corn and turnip puff are ready to be devoured.

10.  My Mom’s homemade pumpkin pie.  Pumpkin pie for Thanksgiving is a homey tradition we can’t do without and her pie hits the spot.

11.  The men all managed to nod off for a well-timed nap right after the meal was over.  I have to wonder if tryptophan is the cause, or if they’re employing well-timed dish-washing avoidance strategy?!

12.  Later in the day we manage some how to get hungry again.  We set a less formal table with sandwich fixings and haul out the turkey platter.

13.  We round out the turkey sandwich meal with salty snacks and cookies that my Mom and Val bring.  We’ll have a full-fledged Leftovers Meal tomorrow.

We have so much to be thankful for and we are so truly grateful, wishing you and yours a wonderful Thanksgiving week.  

Homemade Perogies — Comfort Food for a Winnipeg North-ender

Last weekend when it came time to eat, both Bjorn and I were hungry for the same thing:  “real food.”  We’ve been raking tons of leaves, the air is chilly, it gets dark early at this time of year which is more than enough to make a person crave warmth and comfort.  To us, “real food” is the food that we would have eaten as children.  It is wholesome, homemade, hearty and satisfying– something Grandma would make.  This particular meal is one I grew to love as a child but isn’t one that either of our Grandmas would have made–though amazing cooks, there isn’t a Ukrainian among them.  I grew up in the North End of Winnipeg so many of my friends and classmates had a Baba.  There is a large population of second, third and forth generation Ukrainians settled in the North End.  Family recipes are preserved and propagated through their use at wedding socials, at social clubs suppers, church fundraisers and in restaurants that serve good, home-style Ukrainian food.  I can say with assurance that even without a Ukrainian relative, any Winnipegger worth her salt knows a good perogy.  To me, perfect perogies are filled with a cheesy potato mixture, boiled and fried with onions until they are golden and crispy and served with sour cream.   Perogies can be the center of a meal on their own.  When served with borscht, holobtsi, kovbasa and a slice of City Rye or Pumpernickel bread and butter, you are having a homey, North End feast.  I set about to make perogies from scratch for the first time last week.   I didn’t have the advantage of Hunky Bill’s Perogie Maker or a Baba’s recipe so I followed my instincts and took some guidance from a pierogi recipe by Martha Stewart.  Martha is Polish so she uses the Polish spelling for Pierogi.  Each Eastern European country has their own name for a perogy, and each family has their own variation on the recipe and favorite way to serve perogies.  Whether you call them perogies, pierogi or varenyky the general concept of a perogy is the same:  a soft, unleavened dough is stuffed with potatoes, vegetables, herbs, cheese or meat, boiled and sometimes fried, and typically served with fried onions and sour cream or jam. I made half the quantity of Martha’s dough and potato filling, doubled the cheese and I channeled “North End Baba” while a I rolled, stuffed, boiled and fried.  I found the dough forgiving and easy to handle.  I floured the counter and rolled the dough to 1/8 inch thickness, then cut as many rounds as a I could with a juice glass.  I measured the cheesy-potato mixture into each round with a scoop to avoid over filling any.  The potato mixture is the consistency of dry mashed potatoes, since it contains no milk or cream.  It was surprisingly easy to stretch, fill and pinch the soft dough to form tightly sealed, plump crescents.  I boiled all of the perogies in batches of 8 or so.  Not a single one burst open.Some people stop here and eat perogies after boiling them.  We tasted one, and found it tender and thoroughly cooked, but the next step of frying the boiled perogies with onions is my favorite preparation.  After boiling the perogies, I froze half of the batch, spreading them out on a lightly greased cookie sheet and covering them with saran wrap to fry up another day. Roasted red beets are a good side dish to serve with perogies.  So often I read recipes for roasting beets skin on and then slipping the skins off after they are roasted.  I find this to be a messy way to nearly burn my fingertips and dye them pink.  Instead, I peeled and sliced red beets before roasting them.  I coated them lightly in olive oil and sprinkled over some thyme from our garden that I saved and dried, and roasted the beets at 425 degrees for about 40 minutes.

I love the way roasting a vegetable with herbs deepens its flavor and intensifies its color.  The aroma of roasting thyme is the inside-the-house equivalent to autumnal the scent of fallen leaves.

 I fried our perogies in butter with sliced onions. The results were exactly what we were hoping for– my perogies were homey, satisfying and so delicious that I could hardly believe I made them myself.  The meal took me right home to Winnipeg, I will always be a North Ender at heart.  

Thanksgiving Brew

Bjorn started brewing beer last year, and we enjoyed his first efforts very much.  He uses brewing kits from Northern Brewer, a brewing supply store here in Saint Paul.  A kit is a great way to learn the brewing process, which is fairly involved, and still expect tasty, drinkable results.  Now that it is fall, it is time to begin brewing again.  Last weekend, Bjorn started a batch of Brickwarmer, a Holiday Red Ale which should be ready in time for Thanksgiving dinner.

The day before brewing, Bjorn activates the yeast.  Brewer’s yeast arrives in an envelope that is activated by smacking the package.  The envelope expands for 2-12 hours.  This can be added directly to cooled wort, or used to make a yeast starter which allows the yeast a chance to eat the wort and multiply before it is pitched, or added to the wort to begin fermentation.  It also makes our kitchen smell like rising bread.  To make the yeast starter, Bjorn heats water and adds malt extract and boils this mixture into wort.  Once it has boiled for a while, the wort is cooled to 75° and yeast is added.  This mixture in transferred to a flask which sits on a stir-plate for about a day.  A small magnet inside the flask keeps the mixture stirring.

On brewing day, our house fills with steam and the heady aromas of yeast, malt and hops.  Here, Bjorn is steeping specialty grain into the water to add colour and flavor.

Apparently, we’re not going observe the “Washing Vegetables Only” label on this washtub…here, malt extract is warming in hot water to help it pour easily.

Bjorn making wort by adding the liquid malt extract to water.

The brew master is starting the wort boil, avoiding boil over (read: mess) and anticipating hot break.  He is also anticipating a Minnesota Vikings victory.

Boiling the wort after the second hop addition.

Once the boiling and adding of malt and grain is completed, the wort has to be cooled before you can pitch the yeast.  Last year, Bjorn used an ice bath in the sink to cool the wort in the kettle.  He found that an ice bath wasn’t efficient, so this year he bought a wort chiller.  A wort chiller is attached to the sink, and circulates cold water through copper tubes inside the kettle which chills the wort quickly, leading to better beer.  First, the wort chiller is sanitized in the boiling kettle of wort.

It took Bjorn some quality time sitting on the floor with a Menards employee searching out a series of sink and garden hose connectors and adapters that allow the wort chiller to connect to our sink.  3 garden hose and sink connectors later, we were in business.

Using the wort chiller, Bjorn reduced the wort temperature from boiling to the mid-seventies in 13 minutes.

Several steamy hours later, the wort is aerated, the yeast pitched, and the carboy of beer is topped with an airlock to allow bubbles to escape while the beer ferments in a cool, dark closet in our basement.  I’m looking forward to tasting this beer at Thanksgiving!

Roasted Tomatoes for the Rest of Us

I am taking no extra credit for this exceptionally simple and lovely recipe which was inspired by, and based on blog posts by Deb Perelman of Smitten Kitchen and Heidi Swanson of 101 Cookbooks.  They do everything so beautifully–perfect food styling, perfect lighting and in the case of Deb Perelman, self-depreciating, humorous prose.  No wonder they’re getting cookbook deals left and right.  I’m posting this because I just want to make sure that all the rest of us have a recipe for roasted tomatoes. 

This slideshow requires JavaScript.

 My requirements?  It has to be simple and just as good as the big-time food blogger versions, but accessible.  For most of us, 2 pounds of heirloom tomatoes are basically unavailable.  That would cost about $45, wouldn’t it? So, that is my main adjustment to Heidi Swanson’s recipe.  Deb Perlman roasted her tomatoes for 4 hours. The low heat was a good thing, keeps the house cool, and all.  But the 4 hours is not workable—I get home from work about 6 and I’m not up for hitting the kitchen immediately, not to hunker down for supper at 10 p.m.  Whether you have heirloom tomatoes from your own back yard [we would, if the squirrels weren’t eating them all], some organic grower, or, like me today, 2 pints of Minnesota grown grape tomatoes in clear cubic plastic boxes from the closest grocery, purchased for less than $2 a pop– you can and you should be roasting tomatoes.  So good.  So easy.  No spendy fruit or 4-hour cooking window required.  These babies go wonderfully on burgers, in sandwiches, on pizza, in salads or pasta, or on their own.  

Roasted Tomatoes –  1 hour, 350 degrees

Wonderful on Salads, Pasta, Pizza, Sandwiches and on their own.

Ingredients:

2 pints of Grape or Cherry Tomatoes, halved top to bottom

A few tablespoons of olive oil

Salt and Pepper

Optional:

Sprigs of fresh Thyme or Rosemary, Parsley or Basil

4-5 cloves of Garlic, unpeeled

Method:

Place oven rack in top 2/3 of oven and preheat to 350 degrees Fahrenheit.

Half the tomatoes and toss lightly in oil until just glistening.

Arrange tomatoes cut-side up on a baking sheet lined with parchment paper.

Season tomatoes and add herbs, aromatics and whole, unpeeled cloves as desired.

Roast for 45 minutes to 1 hour, until partly dried out, sweet, juicy and tender.  Store extra roasted tomatoes for 3 or 4 days in the refrigerator, covered in olive oil.

Mandilli de Saea al Pesto with Peas

I started out my last post saying that summertime “is a season to avoid being booked and busy as much as possible, to allow time to be free to savor summer’s simple pleasures.”  A few nights ago, I came home intent on making Mandilli de Saea al Pesto with Fresh Garden Peas –this supper is one of the reasons I avoid being booked and busy.  I have been waiting since January to roll out Silk Handkerchiefs or Mandilli de Saea and, cook them gently, and  coat them with a stunning, bright green, fragrant pesto made with basil from our garden.

I began by shelling a pound of farmer’s market peas.  Just-cooked, freshly-shelled peas rounded out our simple supper perfectly. 

I have rolled out fresh pasta in various formats, and made pesto a time or two, but I don’t claim to be an expert on either, though my technique has certainly gotten better over time.  I first learned to make fresh pasta at a cooking class I took at the Chopping Block Cooking School located in the Merchandise Mart in Chicago that my sweetheart gave me as a Christmas present a few years ago.  I will shamelessly admit that everything I have learned since I can attribute to watching cooking shows on T.V.  I usually follow Lidia Bastianich’s recipe for fresh pasta which is simple, using a food processor, readily available all-purpose flour and a little olive oil which makes a silky dough.  I came home from work and immediately got to work using our handy-dandy food processor to mix up a half-recipe of pasta dough—two people don’t need 1½ pounds of pasta sitting around.  Thank you Lidia for making your dough in the food processor.

Lidia’s  Pasta Dough – Yield 1½ pounds of dough

3 cups all-purpose flour
3 large eggs, lightly beaten
¼ cup extra-virgin olive oil
7 tablespoons very cold water, plus more as needed

Process:

Measure the flour into the food processor, and give it a quick buzz to distribute air throughout.  Crack eggs and measure liquid into a separate bowl.  Start the processor on high, and stream the liquid ingredients into the processor.  Once combined, the dough should form a ball at the end of the processor’s blade.  If it is crumbly, add cold water one tablespoon at a time until a ball forms.  If the dough is sticky, knead in a small amount of flour until the pasta is smooth.  Form the dough into a disk, wrap in saran wrap or a clean towel and let rest for 30 minutes.  After resting the dough, cut the disk into 8 equal pieces (or 4 if you are making a ½ recipe).  Begin by rolling the dough through the largest setting of a pasta machine, fold it once, and then roll through the largest setting again.  Roll the dough through each successively smaller setting once, until the noodles reach the desired thickness, which for Mandilli de Saea, should be thin enough to be semi-transparent.  I rolled my pasta through settings 1-6 using the flat pasta rolling attachment on my Kitchenaid Mixer, then used a rotary pasta cutter to slice the long sheets of pasta into squares of roughly the same size.  Perfection isn’t necessary.  One of the beauties of homemade pasta is its humble nature.  Italian Grandmas aren’t measuring each square with a ruler.

I placed a clean, lightly floured dish towel on top of a rimmed baking sheet, and laid the handkerchiefs on it, side by side.  Once one towel was filled, I gently layered another on top of it, filled it with squares of pasta, and continued to layer pasta between towels, one on top of the next until all of the pasta was rolled.  I covered the top layer with an additional towel to keep the pasta from drying out too fast.

Paolo Laboa’s Genovese Pesto

15-20 Leaves of Genovese Basil, Soaked in cold water to reduce Chlorophyll
2 Cloves of Garlic, peeled
A small handful of Pine Nuts
Approximately ½ Cup of Grated Parmesan Cheese
Ligurian Olive Oil, or Light Olive Oil
Pinch of Sea Salt

I follow Chef Paolo Laboa’s Chow Network tutorial on creating the perfect pesto as closely as possible.  In the past this has involved attempting to grind and mash the ingredients together by hand into a creamy, perfectly-emulsified green paste using my mortar and pestle.  This week, there was an unfortunate freak accident in our kitchen, which involved an old kitchen drawer that was mounted to the wall and used for years as a shelf falling (or leaping?) to the floor.  Apparently, one of the screw-in hangers was stripped.  When the shelf came down it took with it its contents, about half of which were smashed to smithereens.  My precious Mortar and Pestle, Butter Bell butter crock, the stopper to my vintage vinegar bottle and a tiny lidded pot de creme vessel all met their demise along with a full bottle of balsamic glaze.  The incident left kitchen cupboards and floor and the inside of an open drawer splattered with sticky, syrupy balsamic glaze which affixed the jagged remnants of the broken crockery firmly to the tile floor.  It will take several more rounds with a bucket and sponge to get every glued-down shard out of the grout between the floor tiles.  Sadly, everything but the balsamic glaze was a Christmas or anniversary gift.  Though I am a little heavy-hearted having several gifts broken to bits, these things can be replaced.  In the meantime, it gives me a good excuse to use the food processor to make pesto which isn’t Paolo Laboa’s way, but it is much easier.  

Grate approximately ½ cup of Parmesan Cheese into the bowl of the food processor.

Add a handful of pine nuts, a sprinkle of sea salt, and two peeled cloves of garlic and pulse ingredients together to form a paste.

Add 15-20 leaves of Genovese Basil which have been soaked in cold water to reduce the chlorophyl.  Chlorophyl gives plants their verdant hue, and it improves the basil flavor to have it taste a little less “green.”  Add a small amount of olive oil, and pulse, stopping to scrape down the sides of the food processor.  When the ingredients have become a thick paste, stream in additional oil while running the processor until the pesto has a smooth texture.

Cook the pasta handkerchiefs in a large pot of boiling, lightly-salted water for 1½- 3 minutes, until al dente.  I cooked the peas in a separate saucepan of boiling water and drained them after 1½ minutes.  In a large bowl, mix the pesto with a small ladle-full of hot pasta-cooking water to melt the parmesan cheese, then added the pasta and peas to the bowl.  Gently stir the hot sheets of pasta and peas through the pesto to coat each surface with warmed, melting sauce.

We sat down immediately to eat at the table on our patio that faces the garden.  All of the senses are engaged in the preparation and enjoyment of this meal.  The process is completely justified by the result.  There is no way to duplicate the fragrance, colour, texture or flavor on this plate using frozen peas, jarred pesto, or pasta from a box.  We enjoyed the meal the only way it should be made– totally from scratch, in season and eaten al fresco.  A fresh plate of Mandilli de Saea al Pesto, piled high with sweet, fresh peas is a wonderful summer-only dish.